
WHAT DOES ANALOGUE GEAR DO TO SOUNDS?
Bruce Aisher explores the effects of analogue recording methods, explaining why they might be beneficial to your production process.
On the face of it, there’s an interesting conundrum buried in the suggestion that analogue recording sounds better, most recently debated by Gregory Scott in his Attack column on ‘the love of tape’. All kinds of technical expertise has been utilised to improve the technical performance of audio recording formats over the last half a century or more, but more than any other point in that period we’re now looking back to older hardware to deliver that elusive bit of extra vibe in our music. So what’s really going on? What is it that makes these apparently less accurate recording techniques so appealing?
In this article we’re working with some of the elements of Sample Magic’s recent Vinyl & Tape Drum Hitsand Vinyl & Tape Melodic Shots packs in order to take a closer look at the technical reasons behind . We’ve also managed to procure the original samples prior to analogue processing by way of a comparison.
NOISE
Before we dive into specific testing, it’s worth considering one of the most important ways that analogue recording can alter the sound. Tape in particular is associated with noise in the form of hiss. This varies in terms of its frequency content between tape machines, and dependent on the type of tape used. Many people consider hiss to add character, but it’s generally considered a problem, though better machines tend to have increased headroom (see our examination of levels for an explanation), minimising the issue.
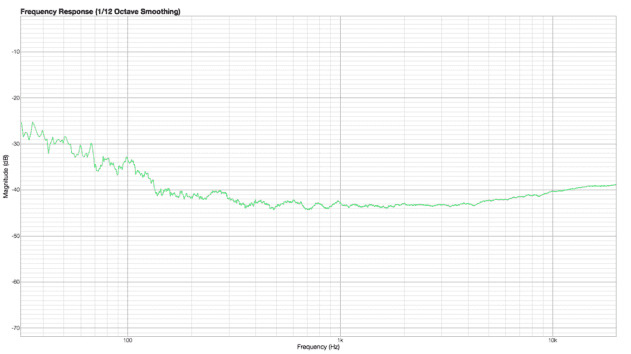
Here’s an analysis of the frequency spectrum of white noise:
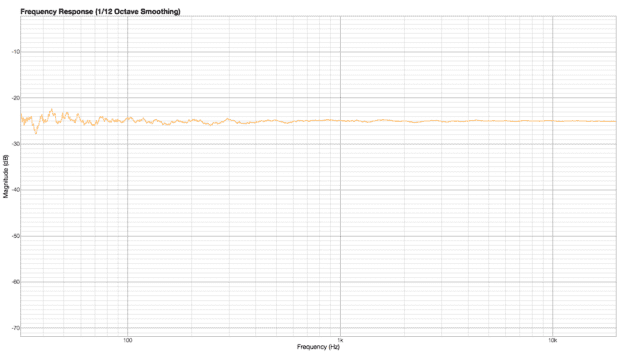
For comparison, here’s a recording of white noise at 15 ips (inches per second):
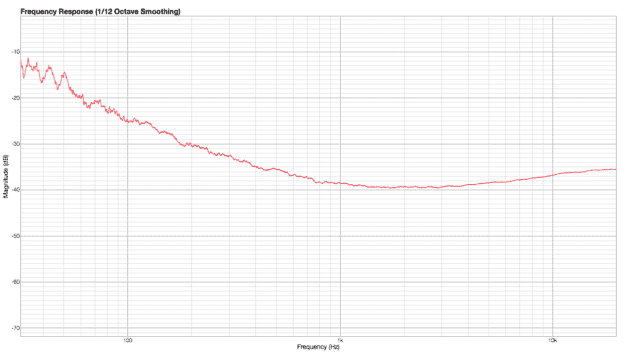
And at the less noisy 30 ips:
Before we even think about hitting the record button, tape guarantees an element of colouration in the form of hiss. But this is just the tip of the iceberg. Let’s take a closer look at additional ways analogue recording might colour our sound.
FREQUENCY RESPONSE
There are many factors that alter the frequency response of a recording, but while a decent digital recording system is quite flat from 20 Hz to 22 kHz (or more), many analogue systems exhibit a gentle rolling-off in higher frequencies through their usable range, and a more extreme drop-off at the high end.
Again, this varies with speed. Whether you use tape or vinyl, the recording and playback speed alters this significantly. Broadly speaking, higher speed equates to better high-frequency extension. (Interestingly, the speed of the needle relative to the groove on a 12-inch record is less than half its maximum by the time you get to the centre. This is why many mastering engineers avoid cutting grooves too close to the label.)
We can see (and hear) the effects by looking at this comparison of frequency response between the original digital recording and the cassette version of this cowbell sound:
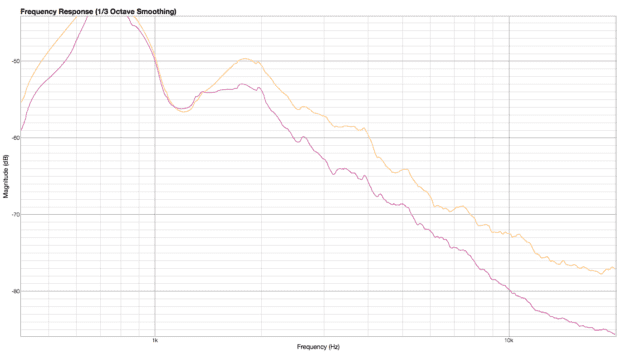
COWBELL – DIGITALCOWBELL – CASSETTE
The cassette version (in purple) is clearly more muffled in the high frequencies than the original digital recording (in orange).
Things improve in the top end when recording to a professional tape machine. In this case we’re dealing with the Studer A80. This is a classic professional reel-to-reel machine. The result is noticeably different to the cassette:
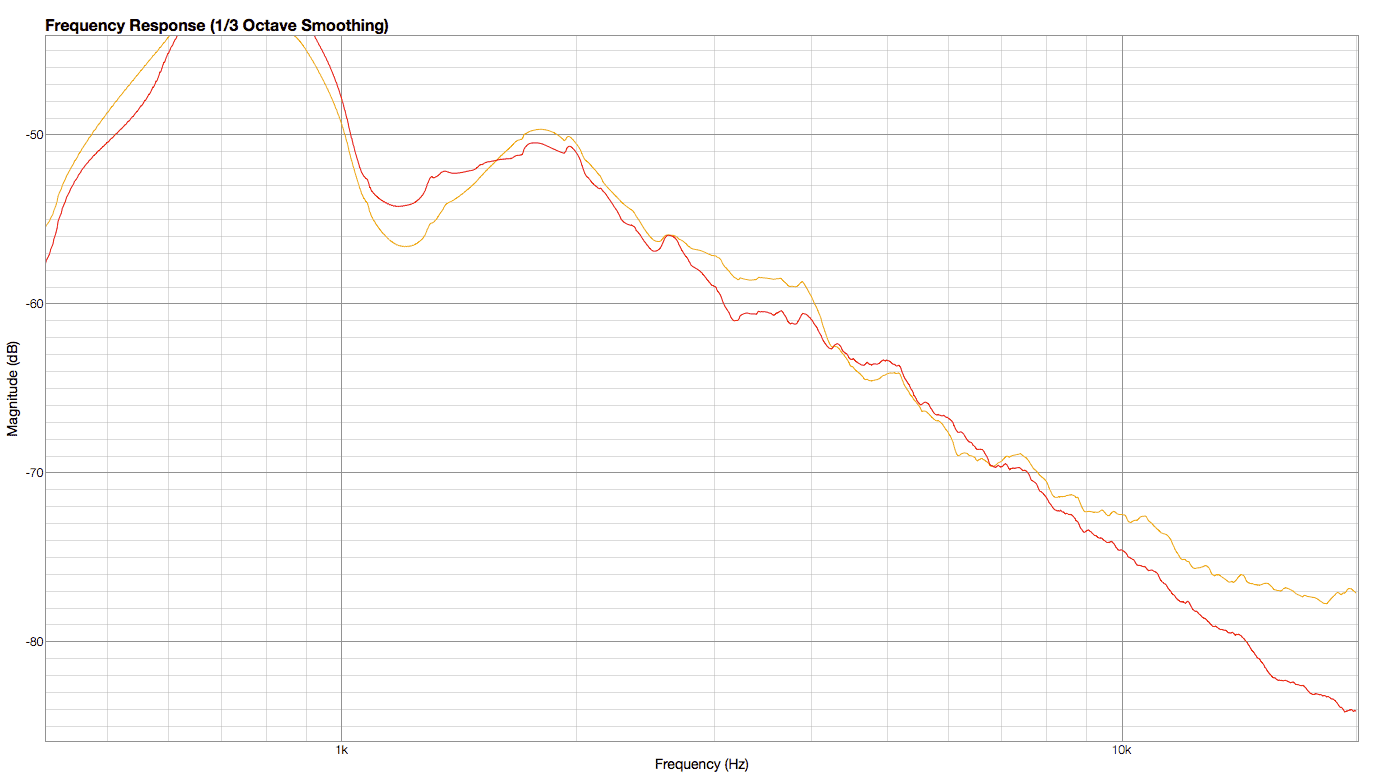
However, if we create a graph showing the difference between the digital and A80 versions you can see that there’s more than just a slight EQ roll-off going on:
We can see a similar effect if we compare the difference between a digital recording of a snare hit and a version of the same sound cut to vinyl:

GETTING DIRTY
So far, this all assumes we’re using a medium that has a broadly similar performance across quiet and loud sound sources. In fact, most analogue recording gear has a much smaller ‘linear’ range when compared to modern 24-bit DAWs.
Tape in particular exhibits frequency-dependent compression, which becomes more and more significant at higher signal levels. This delivers the much-loved sound of tape saturation, and a progressive form of audio ‘squashing’ that is associated with ‘warmth’.
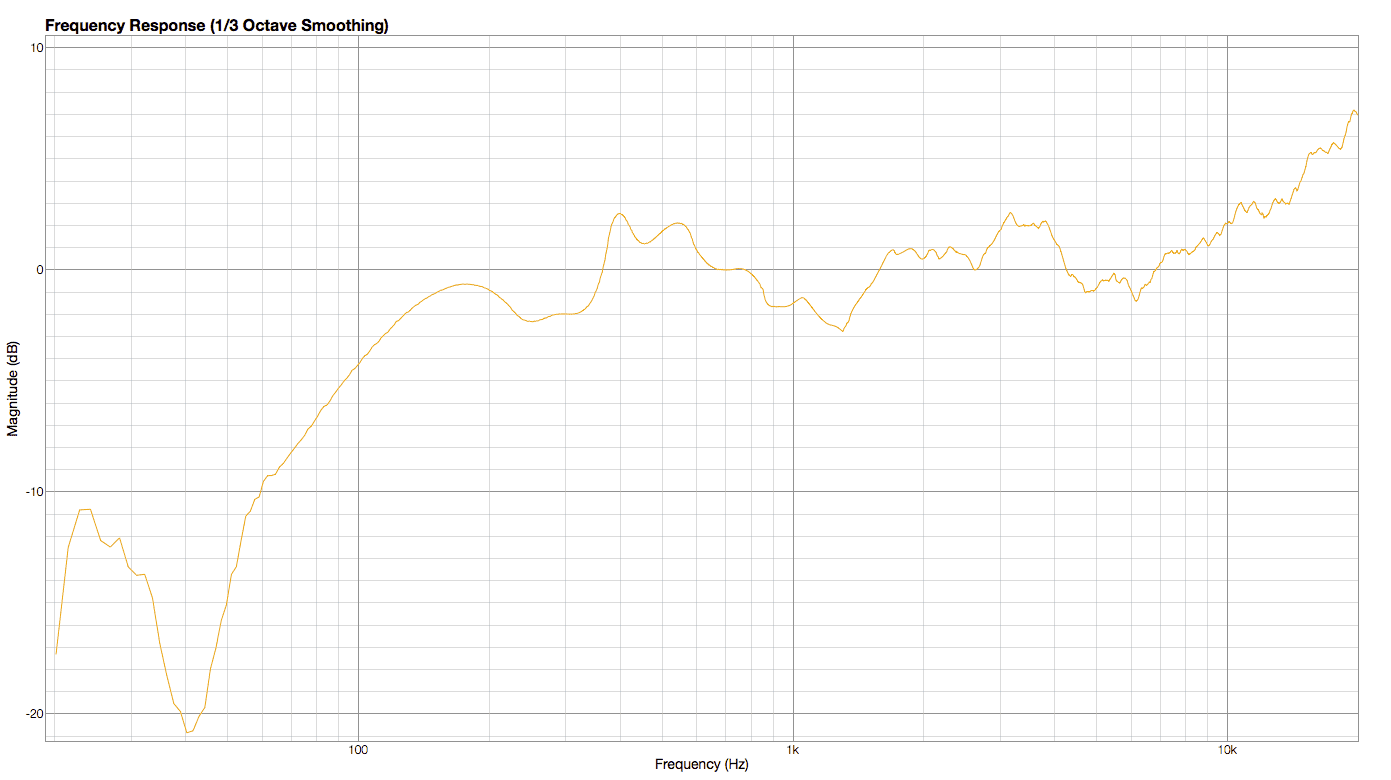
A good way to see this in hear this in action is by taking a bass sound…
…and comparing it with two different tape versions…
The first is a ‘normal’ recording, while the second is recorded ‘hot’ (i.e. with the signal pushed to higher levels on the input), and therefore creating enhanced saturation.
The frequency response chart clearly shows a more complex curve for the hot tape version (orange) in the 400-1000 Hz range when compared to the original (red):

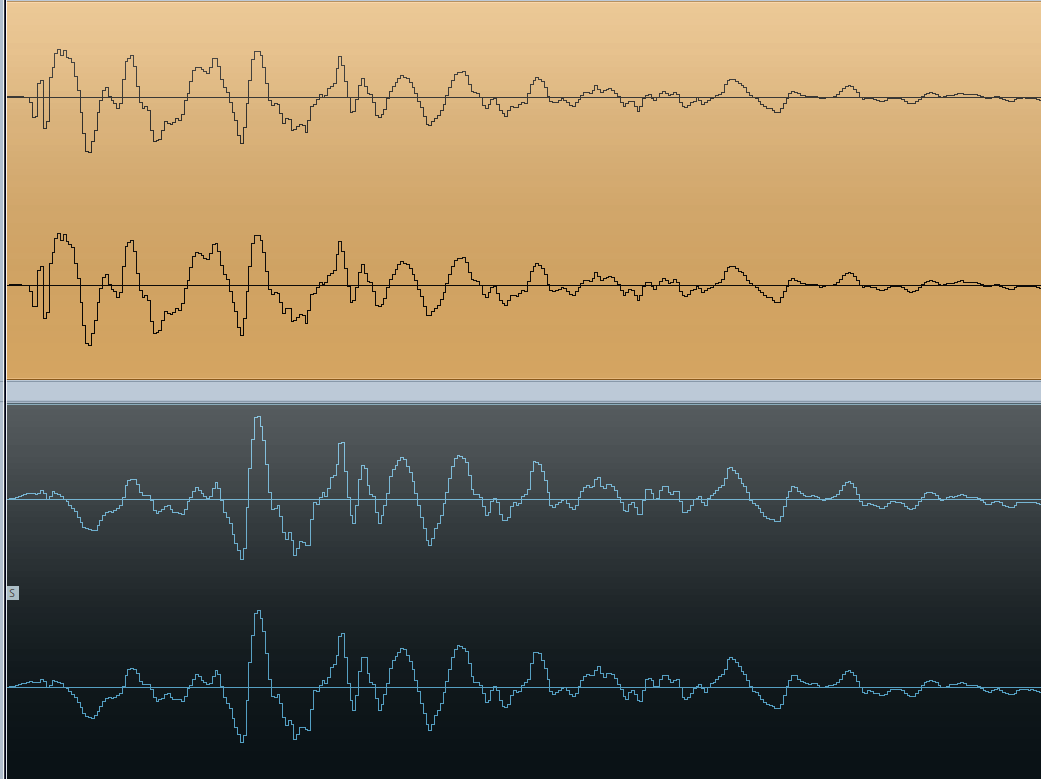
However, this doesn’t provide the full picture. Comparing the two in a waveform editor shows that the waveform undergoes quite a bit of transformation in the process:
CAPTURING THE MOMENT
Pushing the incoming signal level is most definitely where much of the excitement lies, but there is a possible downside to saturation. Squashing a signal dynamically can mean losing some transient detail.
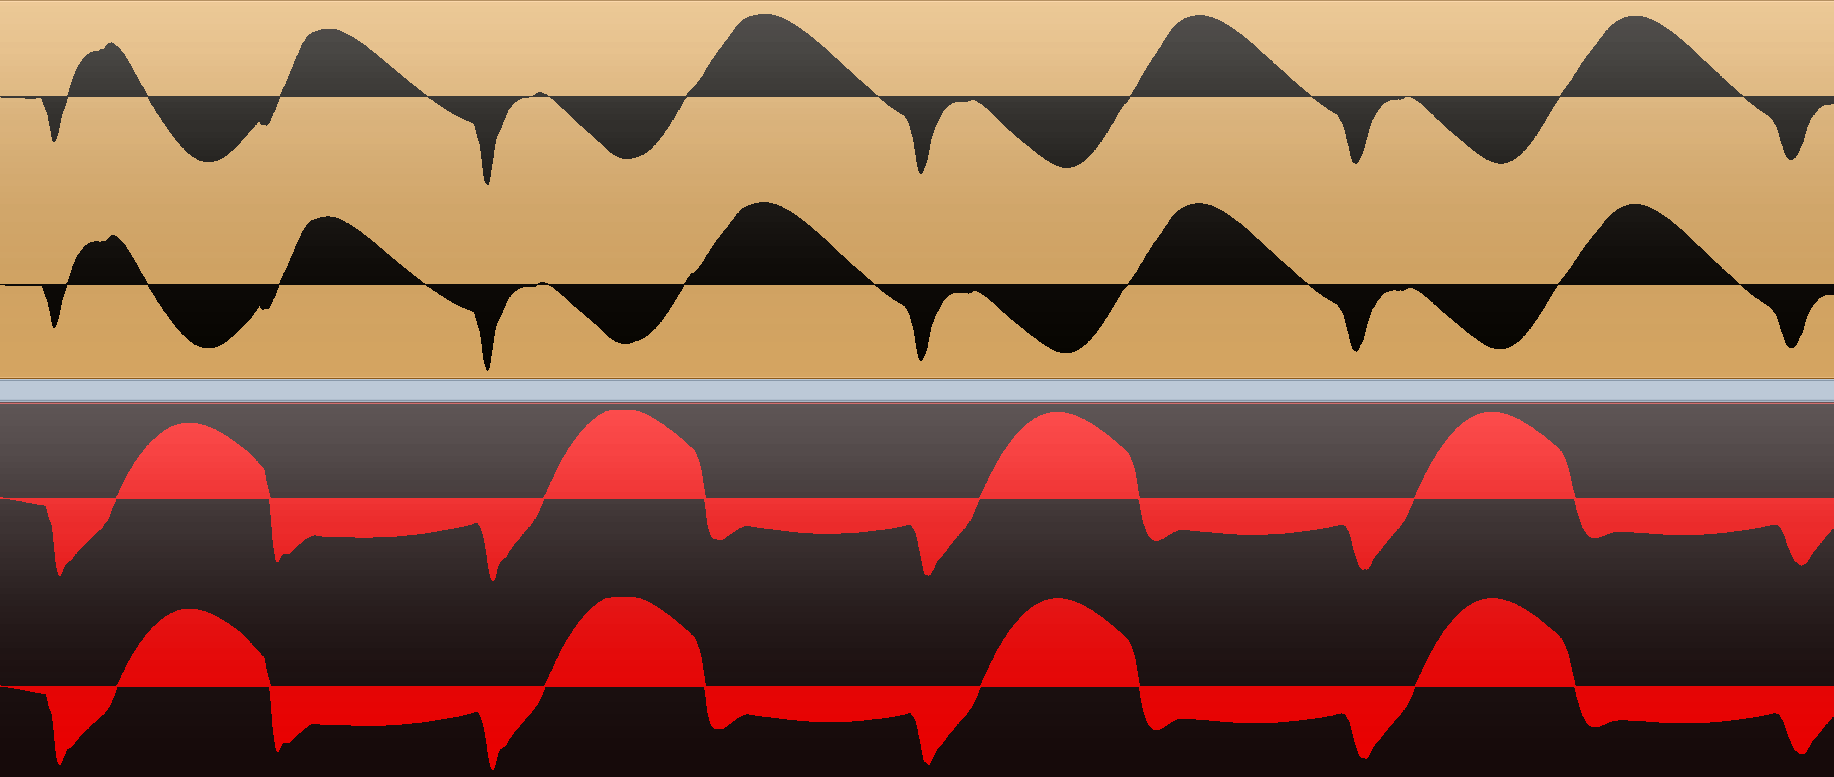
This is especially important when it comes to drum sounds.
Here we have a layered snare and clap hit. Comparing the attack portion of the waveform of each helps us see what is going on. The original is shown by the black wave on a tan background, while the tape version is the blue line on grey background:
SNARE-CLAP ORIGINALSNARE-CLAP TAPE
Whilst some transient detail can be lost, here (and especially in parts of an analogue signal chain utilising valves or transformers) harmonically pleasing distortions may make for a more favourable, if less ‘accurate’, overall sound.
We looked at harnessing some of these techniques in software in the ‘Adding Analogue’ and ‘Creative Distortion’ walkthroughs.
TAKING THE FALL
Another way of comparing our different audio recording is by using a so-called waterfall display, which shows frequency changes over time as series of slices.
Here we’ve applied it to a brassy pad swell. Here’s the original pad recorded to digital:
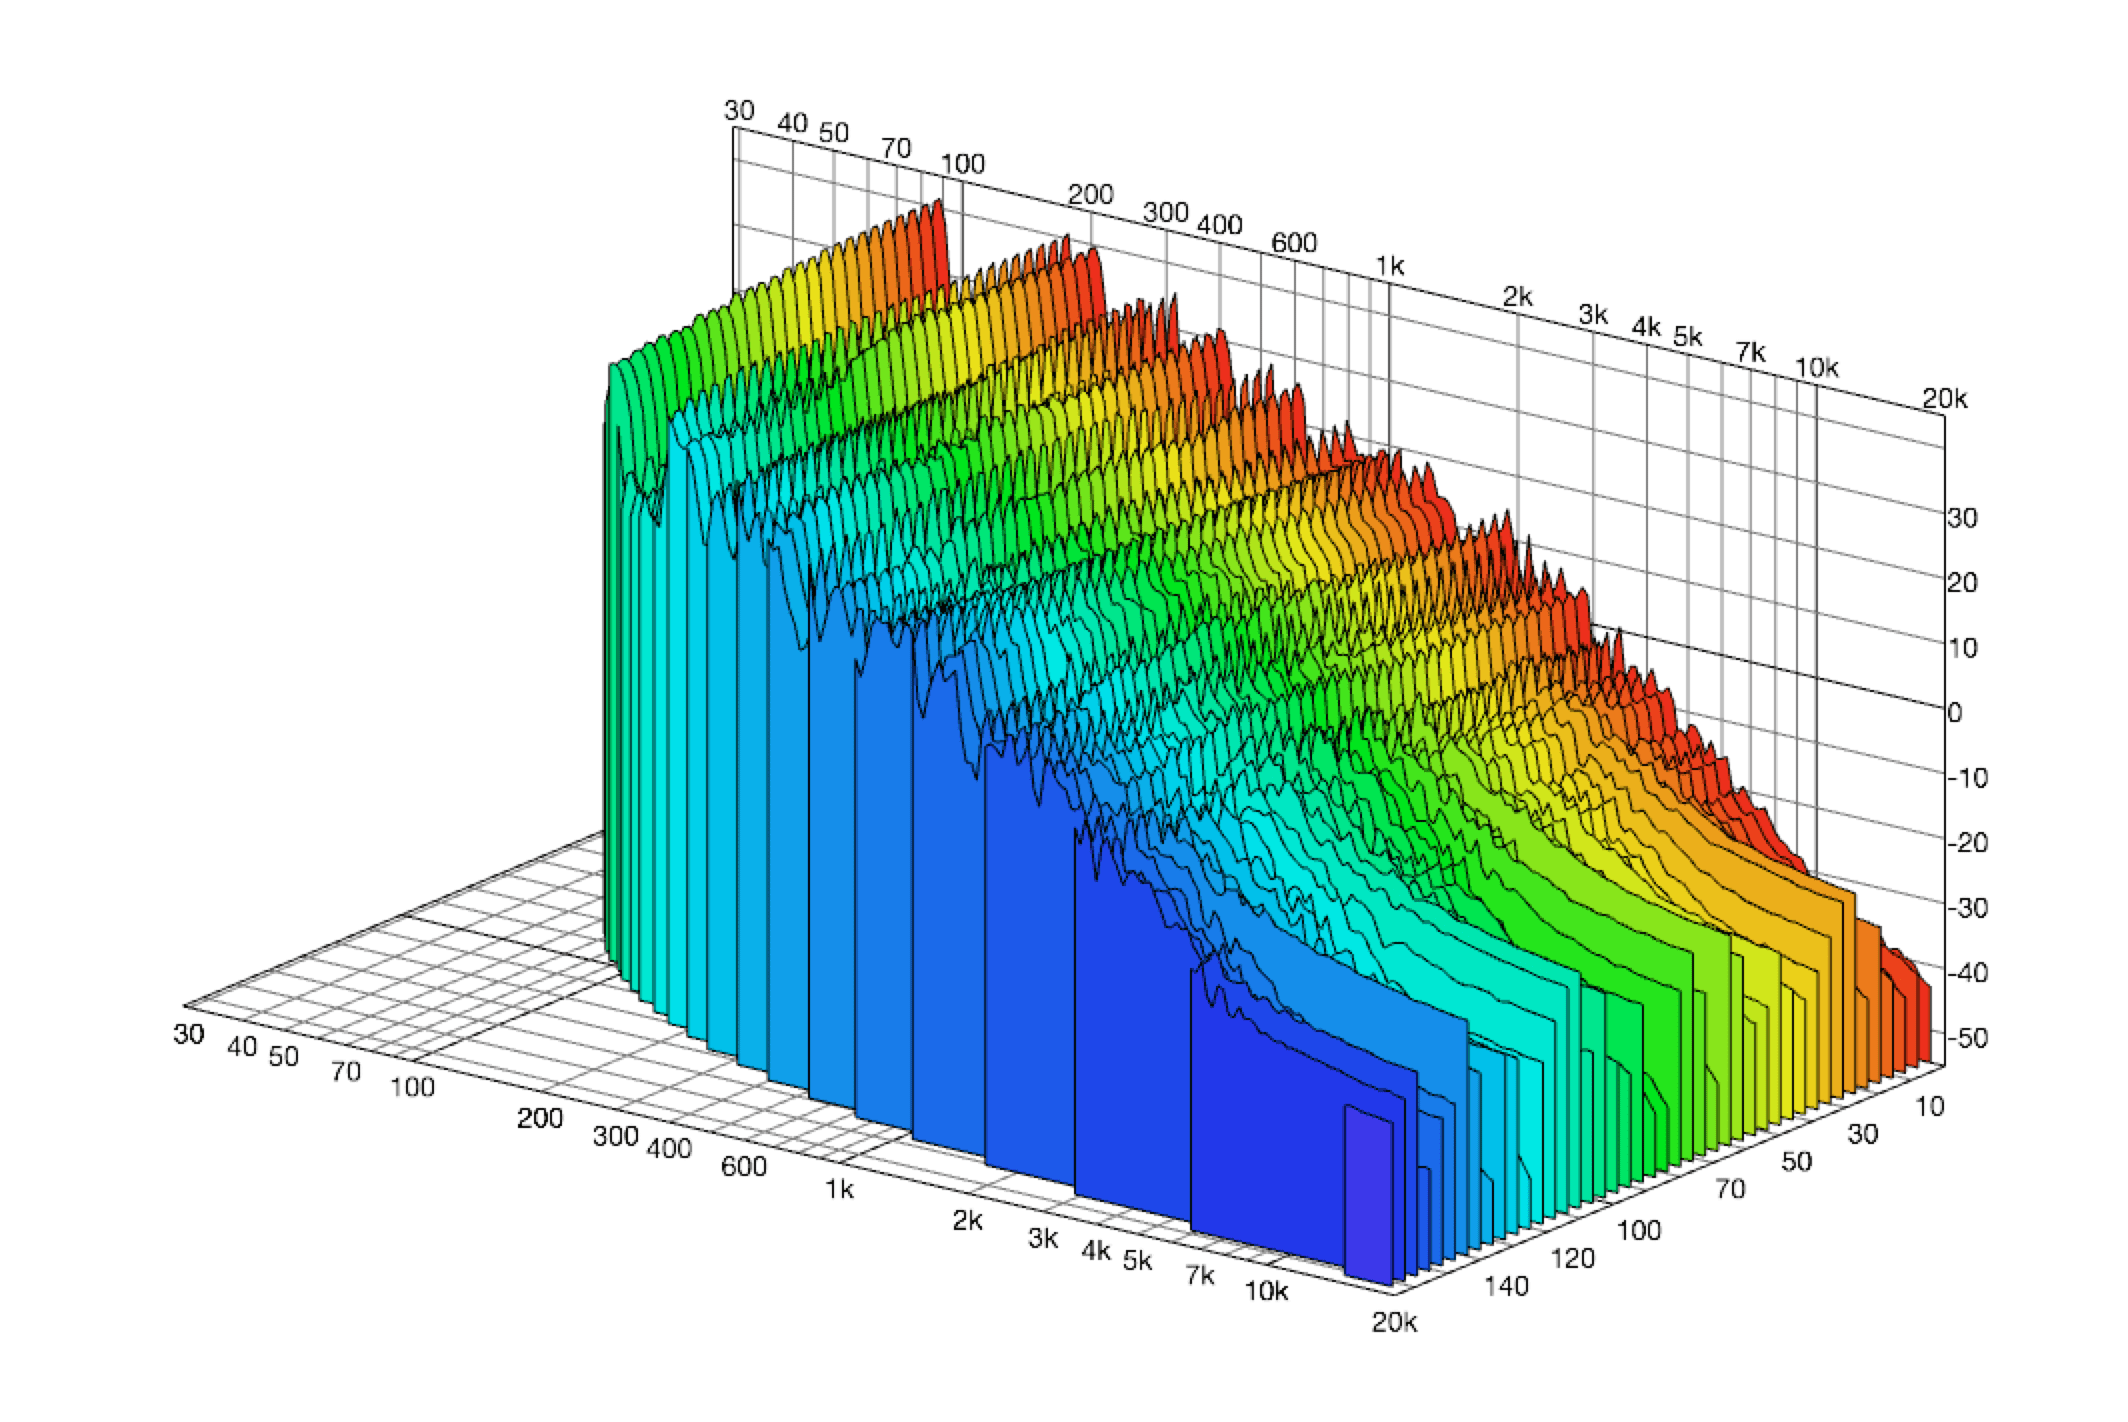
And here’s the same pad cut to vinyl:
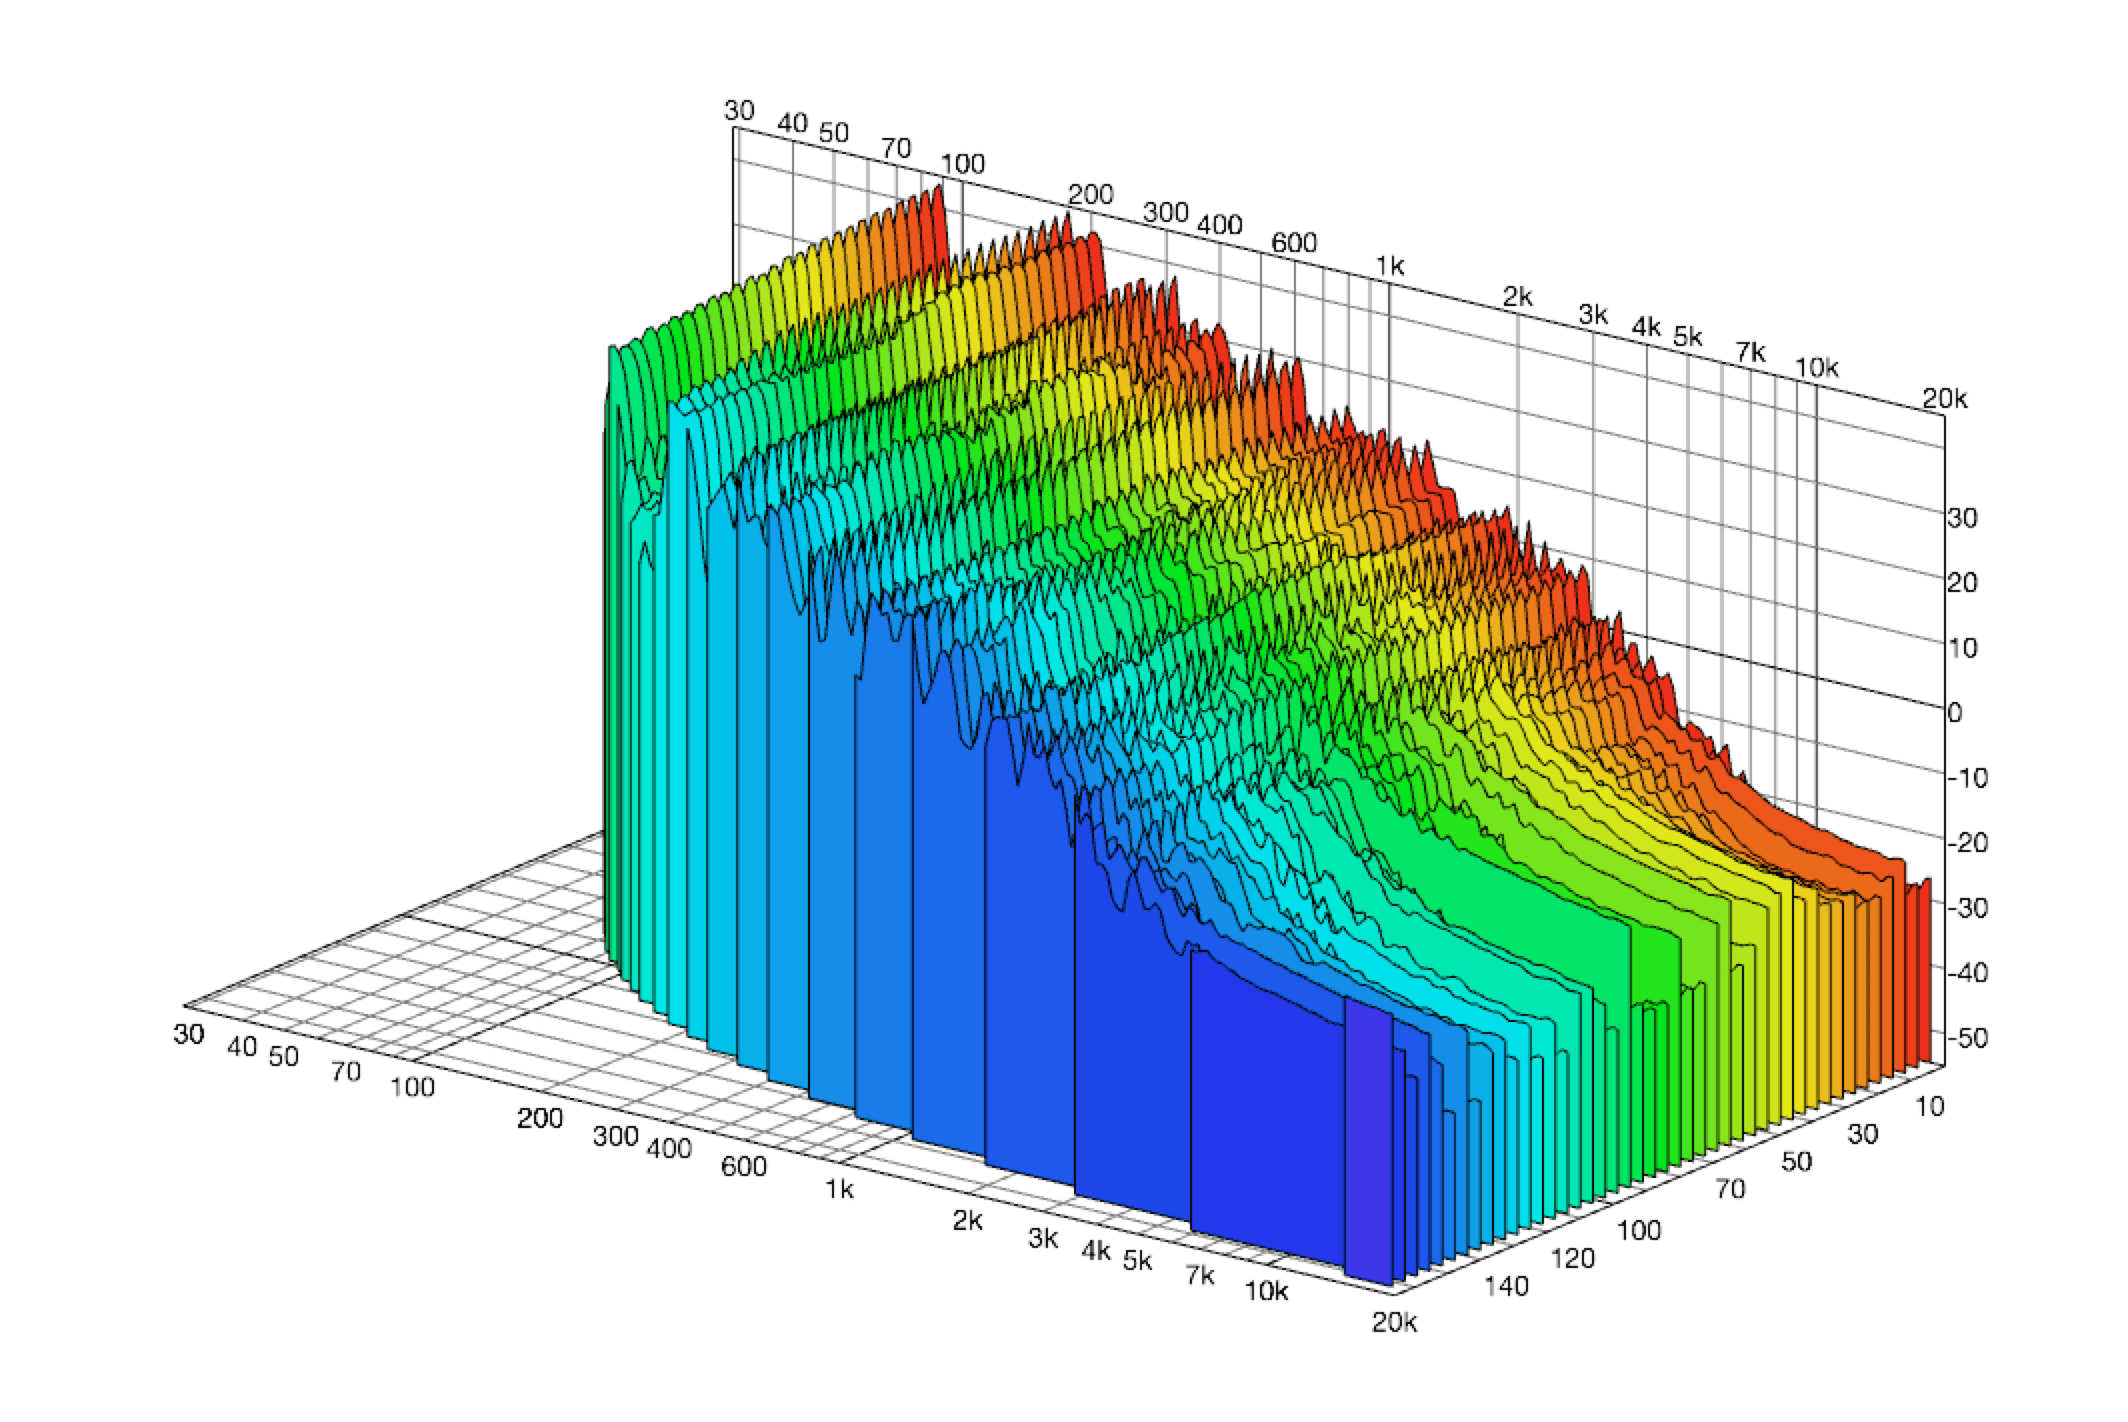
The graphs are smoothed to a 1/12 octave resolution, which makes it easier to get a handle on the overall timbral changes. We can clearly see the difference in response, particularly in the higher frequencies but also in an overall smoothing of the dynamic response around 200 Hz.
DESK JOB
So far we’ve focused on analogue recording mediums, but it’s not all about vinyl or tape. It’s worth bearing in mind the impact of analogue signal chains in between other (digital) stages, such as a sampler and a DAW.
In this example we’ve got a tom drum hit originally recorded to digital, then bounced back out through an analogue desk before being recorded back to digital:

We can see a significant rolling off of frequencies below 100Hz, but above that point the curves are quite similar. There are differences throughout the frequency range (and a change in sound), but we’re not looking at the same kind of dramatic effect we might get from recording hot to tape.
TOM – DIGITALTOM – ANALOGUE DESK
Subtle flavouring is the key here.
IN THE BOX
So how do we sum up the lesson we can learn from examining the effects of these various analogue processes? For most of The overwhelming majority of producers probably aren’t going to go to the effort and expense of pressing sounds to vinyl to capture the distinctive character of wax (although we’re not saying you should entirely rule out the option if you really want that sound). Likewise, most of us probably don’t have the luxury of expensive professional tape machines. But we can achieve similar sounds with a little common sense and some much cheaper tools…
Firstly, don’t be afraid to get heavy-handed with EQ in order to soften the tone of sounds. Sweeping cuts from 1 kHz upwards might seem at odds with clarity and definition, but analysis of the response curves of tape and vinyl clearly show a softening from a similar point. Not every element of a track has to be crisp and clear; drastic filtering can be effective in recreating some of the softer, mellower tones of analogue recordings.
Likewise, don’t be scared of noise. With digital synths and recording techniques we’re all accustomed to whisper-quiet noise floors, but the natural hiss of tape and even the subtle hum of some analogue circuits isn’t necessarily a bad thing; embracing a layer of low-level noise in your productions can add character.
Analogue hardware may tend to be relatively expensive compared to digital alternatives, but there are some great plugins out there that allow us to experiment in a broadly similar way. We particularly like U-he Satin for subtle tape effects, PSP’s ever-popular Vintage Warmer 2 for slightly more in-your-face saturation and D16’s Devastor for its powerful multi-band options.
Analogue recording is largely about flavour, and there are times when it can be pushed too far – just like the overuse of dynamic compression – but with a little examination of how these analogue processes affect signals, we can use similar effects to enhance our productions.
FONTE: http://snip.ly/2lOl#http://www.attackmagazine.com/technique/walkthroughs/lessons-analogue-recording-techniques/
Julian Ludwig é diretor do Pro Áudio Clube, produtora de áudio Jacarandá, Loc On Demand e Jacarandá Licensing. Trabalhou para empresas como: Guaraná Antartica, TV Gazeta, NET, Chivas Regal, FNAC, Prefeitura de São Paulo, Mukeca Filmes, Agência LEW’LARA TBWA, Agencia MPM, Agência Content House entre outras. Fez trilhas para programas de TV como: Internet-se (Rede TV), Você Bonita (TV Gazeta), Mix Mulher (TV Gazeta), Os Impedidos (TV Gazeta), Estação Pet (TV Gazeta), CQC (TV Band) Vinheta Oficial TV Gazeta, entre outras. Também atuou em vários longas e curtas metragens, incluindo mixagem em 5.1 e serviços de pós-produção.